|
DiveMaker can be used to build sequential formations all in one
file, along with the intermediate transitions.
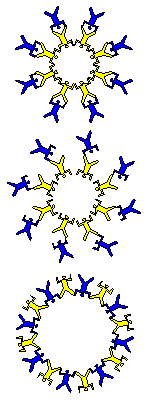
The technique will generate a file that has each formation and
each transition side by side, all printed on the same page. Take
a look at a sample for 10-way sequential:
Graphic(72dpi - same size
as original) or download the DiveMaker File
Shown to the right is the Snowflake - In-out block with the transition.
How To:
- Open a new file.
- Design the first formation.
- Select all the jumpers, copy, paste and then use Ctrl right
arrow to move the jumpers to the right of the first formation.
- Reposition the group of jumpers on the right to show the transition.
In the 10-way example, 3 sub groups are shown: two 4-way donuts
and one 2-way compressed accordion.
- Reposition the window so that the first formation is in view.
Select the jumpers in the first formation by dragging the mouse.
Copy and paste, then use Ctrl down arrow to move the jumpers below
the first formation.
- Now place the jumpers in the second formation. In the example,
each group does a 180 turn and redocks.
- Now select the jumpers in the second formation. Copy, paste
and move them to the right of the second formation.
- Reposition the jumpers to show the transition.
- Reposition the window to show the second formation. Select
the jumpers in the second formation. Copy, paste and move below
the second formation.
- Reposition the jumpers in the third formation. In the example,
the jumpers are in a triple diamond formation.
- Continue to copy, paste and move each group of jumpers to
show the transition and the next point.
- When printing, a resize of 1.5 or 2 will make the jumpers
about the size of stampmen. Remember to increase the font size
too. Also if you plan on scanning or photocopying the dive, use
a thicker line.
|
